I saw this on Pinterest and immediately thought of my little princess.
| www.MissBettyLou.etsy.com |
Would you like to make one for your little princess? Here's how I did it:
Step 1 - Gather Materials
pencil
ruler
scissors
12" square piece of felt
12" square piece of fusible fleece
14" square piece of material
approx. 23 x 23" of tulle or other veil-like material
ribbons, lace, trim/decorations
3" Velcro
Step 2 - Making the Pattern
I'm sorry I don't have pictures of the steps for this part - just the final result. Let me know if these are confusing directions to follow!
Cut your bag open and lay it flat.
Draw a dot in the middle, at the bottom, of the long side of the bag.
Use your ruler and measure 11" to the right of the middle dot. Mark it. Repeat for the left side.
Continue using the ruler and mark 11" away from the center dot all the way from the left to the right. You should end up with a semi-circle. Cut it out.
The flat side of the paper will be used to make the point of the hat. The rounded side will be the bottom.
Wrap the semi-circle into a cone shape (you will have to overlap the ends a bit). Adjust the bottom to fit on your child's head.
Cut off the excess paper on either side of the middle seam.
You should end up with a pattern piece that looks something like this:
Ignore the writing on the paper - that was me thinking it out.
Step 3 - Cutting the Material
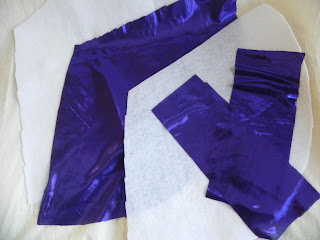
Using your pattern piece, cut 1 from each of the fabric, felt, and fusible fleece.
Cut two, 3" x 7" strips from the material.
Step 4 - Fusible Fleece
Set your iron to its cotton setting (or Hi with steam). Fuse the fleece to the WRONG side of your fabric. Iron for a good minute or so.
Step 5 - Embellishments
If you are going to add any lace, flowers, sequins, etc. to the outside of your hat, now is the time to do so. Sewing through both the fabric and the fleece will anchor your flowers and other embellishments without it showing on the inside of the hat. Make sure if you are adding a lace trim that you leave space for the seam allowance. In other words, don't place it at the very bottom, against the raw edge. Place it about 1" away.
For this hat, I made little butterflies out of the white sparkle felt I used as the lining. They are sewn on just in the middle to make them 3-D.
I also sewed butterflies on to the ends of the ribbon that I wanted coming out of the top of the hat.
Step 6 - Sewing the Hat
Fold the felt piece in half and match the side edges with RIGHT sides of the material together. The top should come to a point. Sew a 1/4" seam all the way up the side.
Lay your tulle veil and ribbons (if any) in the top corner on the RIGHT side of the fabric piece.
Fold in half with the veil and ribbons sandwiched in the middle. Right sides are together.
Pin.
Sew up the side. Turn right side out.
Step 7 - The Straps
Fold your strap pieces in half with right sides together. Sew one short end and down the long side of the strap.
Turn the straps right side out. Press
Top stitch around the straps.
Take a piece of Velcro and place at the end of one strap. Sew in place. Repeat for other strap.
Step 8 - Sewing the Lining and Hat Together
With right sides together, put the fabric, veil, and ribbons inside the felt lining. Pin the bottom, raw edges together, leaving at least 4" open to turn the hat around. You can use this space to pull the veil and ribbons through so that they don't get caught in the seam.
Pin one strap on each side of the hat. The ends should be sandwiched between the fabric/fusible fleece and the felt. The raw edges are lined up. Make sure that the Velcro is facing in the SAME direction (both to the right or left) so that it fastens correctly once the hat is turned.
Sew around the hat.
Step 9 - Finishing
Turn the hat right side out using the opening that was left.Pin the opening closed and top stitch around the entire hat.
All done! Go let your princess enjoy her new hat!


Really cute, thanks for the tutorial! Will these be going into your shop?
ReplyDeletehttps://www.etsy.com/listing/123674480/butterfly-purple-princess-hat
Delete:) Keep an eye out for more in the coming weeks!