Wednesday, February 27, 2013

Gifts!


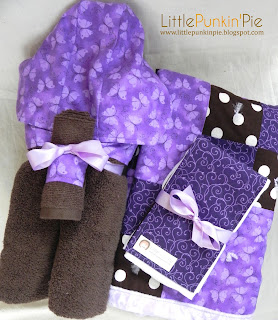
I know you can't tell, but I've been busy making things.  Just this time it's not things for my shop.  There have been birthdays, but the main thing I've been working on is a baby shower gift.  My roommate from college is due in May  with her first, so I've been working on a gift basket for her.

I knew exactly what I wanted to make first, too.  A blanket.  So original - I know.

I have been looking for an excuse to re-create a quilt that was given to my youngest when she was born.  I LOVE this quilt.  It is so soft and comfy and just the right size.  It was given to us by my Aunt Pam and Uncle Bill and it immediately kicked the other blankets out of the running for favorite (including one that I had made).  I took some pictures for you, but it doesn't do it justice.  Besides, at this point, it's so well-loved that it's faded and wrinkled.  I would have ironed it just for picture taking, but my daughter was about to go down for a nap and needed it.  She was pretty worried I was taking it away when I set this picture up.


Anyways, I copied it.  Except in the colors that my friend wanted.  At least, I hope it's what she wanted.  Kind of hard to match exactly from a few hundred miles away.


I love making quilts because it's always a bit of a surprise how it will turn out.  You can match the colors and patterns, but you never really know the result until you SEE it.  I really like how this one came together.  I used minky on the back (just like ours), but it's got a great paisley pattern instead of the raised dots.


Oh how I love minky!

I finished the quilt by placing ties in the center of all of the larger squares and in the middle of 2 smaller squares per 4 square block.

I wanted to give my friend something of a "set", so I also added a hooded towel (with the same paisley print minky on the inside) and a set of burp cloths.


I hope she likes it!!

Thursday, February 14, 2013

Fabric Princess Hat Tutorial: the Perfect Accessory for Your Little Princess!


Is your little girl obsessed with princesses?  My 3 year old isn't so much obsessed with THE princesses (Ariel, Cinderella, etc.), she just loves the idea of being a princess, any princess.  She LOVES dress up - what 3 year old doesn't?  She prances around the house dressed up in yards of fabric that she insists are "wedding dresses" or "princess gowns".  By the way, that was not a typo.  She goes through my fabric and finds the shiniest, most sparkly, pinkest thing she can find and wraps herself in it toga-style.

I saw this on Pinterest and immediately thought of my little princess.

birthday hat
www.MissBettyLou.etsy.com

I was originally thinking that I would just make it for her birthday in June.  Then I thought, why not try to make a princess hat for her?  So that was my inspiration for this princess hat.


Would you like to make one for your little princess?  Here's how I did it:

Step 1 - Gather Materials


Brown paper grocery bag for pattern piece
pencil
ruler
scissors
12" square piece of felt
12" square piece of fusible fleece
14" square piece of material
approx. 23 x 23" of tulle or other veil-like material
ribbons, lace, trim/decorations
3" Velcro

Step 2 - Making the Pattern

I'm sorry I don't have pictures of the steps for this part - just the final result.  Let me know if these are confusing directions to follow!

Cut your bag open and lay it flat.  
Draw a dot in the middle, at the bottom, of the long side of the bag.
Use your ruler and measure 11" to the right of the middle dot.  Mark it.  Repeat for the left side.
Continue using the ruler and mark 11" away from the center dot all the way from the left to the right.  You should end up with a semi-circle.  Cut it out.
The flat side of the paper will be used to make the point of the hat.  The rounded side will be the bottom.
Wrap the semi-circle into a cone shape (you will have to overlap the ends a bit).  Adjust the bottom to fit on your child's head.  
Cut off the excess paper on either side of the middle seam.

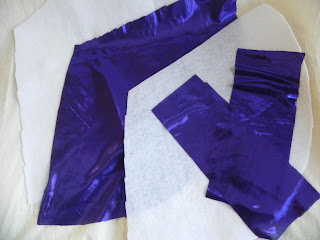
You should end up with a pattern piece that looks something like this:


Ignore the writing on the paper - that was me thinking it out.

Step 3 - Cutting the Material

Using your pattern piece, cut 1 from each of the fabric, felt, and fusible fleece.

Cut two, 3" x 7" strips from the material.


Step 4 - Fusible Fleece

Set your iron to its cotton setting (or Hi with steam).  Fuse the fleece to the WRONG side of your fabric.  Iron for a good minute or so.

Step 5 - Embellishments

If you are going to add any lace, flowers, sequins, etc. to the outside of your hat, now is the time to do so.  Sewing through both the fabric and the fleece will anchor your flowers and other embellishments without it showing on the inside of the hat.  Make sure if you are adding a lace trim that you leave space for the seam allowance.  In other words, don't place it at the very bottom, against the raw edge.  Place it about 1" away.

For this hat, I made little butterflies out of the white sparkle felt I used as the lining.  They are sewn on just in the middle to make them 3-D.


I also sewed butterflies on to the ends of the ribbon that I wanted coming out of the top of the hat.

Step 6 - Sewing the Hat

Fold the felt piece in half and match the side edges with RIGHT sides of the material together.  The top should come to a point.  Sew a 1/4" seam all the way up the side.

Lay your tulle veil and ribbons (if any) in the top corner on the RIGHT side of the fabric piece.


Fold in half with the veil and ribbons sandwiched in the middle.  Right sides are together.

Pin.


Sew up the side.  Turn right side out.

Step 7 - The Straps

Fold your strap pieces in half with right sides together.  Sew one short end and down the long side of the strap.

Turn the straps right side out.  Press

Top stitch around the straps.


Take a piece of Velcro and place at the end of one strap.  Sew in place.  Repeat for other strap.


Step 8 - Sewing the Lining and Hat Together

With right sides together, put the fabric, veil, and ribbons inside the felt lining.  Pin the bottom, raw edges together, leaving at least 4" open to turn the hat around.  You can use this space to pull the veil and ribbons through so that they don't get caught in the seam.


Pin one strap on each side of the hat.  The ends should be sandwiched between the fabric/fusible fleece and the felt.  The raw edges are lined up.  Make sure that the Velcro is facing in the SAME direction (both to the right or left) so that it fastens correctly once the hat is turned.  

Sew around the hat.


Step 9 - Finishing

Turn the hat right side out using the opening that was left.


Pin the opening closed and top stitch around the entire hat.


All done!  Go let your princess enjoy her new hat!


Monday, February 4, 2013

Easy Homemade Valentines


I have a lot of scrap fabric around the house.  Go figure. I hate throwing any piece of usable fabric in the trash.  By "usable" I mean anything that is more the 1"x2".  Therefore, I have a LOT of scrap fabric.  I figure that I can always use them for applique or for little projects like this one.

Being crafty-ish, I thought it would be fun to make the Valentines for my 3-year old's preschool friends.  That's 20 cards.  Then I remembered the teachers - add 3.  Then, I was informed that we needed to make Valentines for her dance teacher, her grandparents (both sets), her library friends, and our neighbor.  Oh dear.  What did I get myself into?  I'd renege on my decision and just buy the Scooby Doo or Princess ones at the dollar store if I hadn't gotten my little girl all excited about making them.  Ah well...it will be a fun adventure, right?

We started early.  A 3 year old with scissors, glue, chalk, and fabric are not fast moving.  Let's just say that she cut out 1/2 a heart while I cut out 5.  I'm just happy she's so into it.  She has been working on these slowly but surely and they are just about done.  So here is what we did.  I think they're cute - let me know what you think!

Step 1 - Gather Materials

card stock (in whatever color you'd like)
pencil
scraps of fabric
1 large heart stencil ( I used Word shapes - high tech)
1 smaller heart stencil (same as above)
chalk
craft glue (we used Tacky Glue)
scissors (safety ones if your child is cutting)
ribbon
exacto knife or rotary cutter (NOT for your child's use :) )
lollipops
A cute saying on printer paper or white card stock for the back of the card.

Step 2 - Cutting out the Big Hearts

Trace your larger heart onto the colored card stock.  I could fit 3 to a page.


Cut them out.


Trace and cut as many as you need. Our pile looked like this:


Step 3 - Cutting out the Smaller Hearts


Gather your scraps.  Here are some of ours.


Take your chalk and trace the smaller heart onto the fabric. For lighter fabric, where the chalk won't show up, you can either use a water soluble pen, or you can just pin the heart like a pattern piece and cut.


Cut the heart out.  I had to do this part as fabric was too difficult for my 3 year old to cut.

Step 4 - Gluing the Hearts Together


Take a card stock heart and a fabric heart.  Put some glue on the back of the fabric heart.


Turn it over so that it is right side up, center it on the larger heart, and press down.


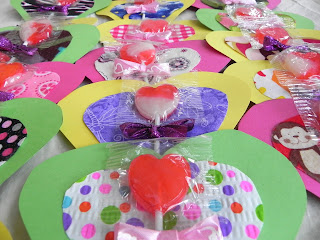
Repeat for all cards. Your Valentines should now look like this.


Step 5 - Attaching the Lollipop

Take your chalk or water soluble pen and mark 2 horizontal, parallel lines in the center of your heart.  I cut them about 1/4" wide and about 1/4" apart.


Take your exacto knife or rotary cutter and cut along the 2 lines.  Make sure you have a safe cutting surface underneath your hearts.


Take a lollipop and thread it through the two slits you just cut.


Step 6 - The Bow

Put the heart aside.  Take your ribbon and cut a strip about 9" long.

Tie your ribbon into a bow. Cut any excess ribbon off so that it looks something like this:


Put a dot of glue in between the two slits cut in the heart earlier.

Attach the bow.


Step 7 - The Saying


Since she is in preschool, I didn't find it necessary to come up with some witty saying.  Besides, all I could come up with was "Because of you life doesn't suck."  I don't think that would be appreciated at school.  Maybe I'll put that on my mother-in-law's.  She'll like it.  Really, she will.


Anyways.  I'm being boring.  All I'm saying is "Happy Valentine's Day!"  Original, I know.


You could do this in Microsoft Word, but I'm using Publisher.  I don't know why - just seems easier right now!  I put my saying in a business card format, made sure there were borders, and printed.  Easy peasy.

Cut out the sayings and glue them to the back of the cards.


Presto!  Some cute Valentine cards to pass out to all of her friends (and family, too)!


Happy Valentine's Day!