

I have a lot of scrap fabric around the house. Go figure. I hate throwing any piece of usable fabric in the trash. By "usable" I mean anything that is more the 1"x2". Therefore, I have a LOT of scrap fabric. I figure that I can always use them for applique or for little projects like this one.
Being crafty-ish, I thought it would be fun to make the Valentines for my 3-year old's preschool friends. That's 20 cards. Then I remembered the teachers - add 3. Then, I was informed that we needed to make Valentines for her dance teacher, her grandparents (both sets), her library friends, and our neighbor. Oh dear. What did I get myself into? I'd renege on my decision and just buy the Scooby Doo or Princess ones at the dollar store if I hadn't gotten my little girl all excited about making them. Ah well...it will be a fun adventure, right?
We started early. A 3 year old with scissors, glue, chalk, and fabric are not fast moving. Let's just say that she cut out 1/2 a heart while I cut out 5. I'm just happy she's so into it. She has been working on these slowly but surely and they are just about done. So here is what we did. I think they're cute - let me know what you think!
Step 1 - Gather Materials
card stock (in whatever color you'd like)
pencil
scraps of fabric
1 large heart stencil ( I used Word shapes - high tech)
1 smaller heart stencil (same as above)
chalk
craft glue (we used Tacky Glue)
scissors (safety ones if your child is cutting)
ribbon
exacto knife or rotary cutter (NOT for your child's use :) )
lollipops
A cute saying on printer paper or white card stock for the back of the card.
Step 2 - Cutting out the Big Hearts
Trace your larger heart onto the colored card stock. I could fit 3 to a page.

Cut them out.

Trace and cut as many as you need. Our pile looked like this:

Step 3 - Cutting out the Smaller Hearts
Gather your scraps. Here are some of ours.

Take your chalk and trace the smaller heart onto the fabric. For lighter fabric, where the chalk won't show up, you can either use a water soluble pen, or you can just pin the heart like a pattern piece and cut.

Cut the heart out. I had to do this part as fabric was too difficult for my 3 year old to cut.
Step 4 - Gluing the Hearts Together
Take a card stock heart and a fabric heart. Put some glue on the back of the fabric heart.

Turn it over so that it is right side up, center it on the larger heart, and press down.

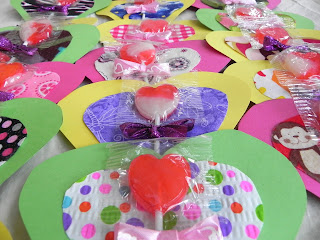
Repeat for all cards. Your Valentines should now look like this.

Step 5 - Attaching the Lollipop
Take your chalk or water soluble pen and mark 2 horizontal, parallel lines in the center of your heart. I cut them about 1/4" wide and about 1/4" apart.

Take your exacto knife or rotary cutter and cut along the 2 lines. Make sure you have a safe cutting surface underneath your hearts.

Take a lollipop and thread it through the two slits you just cut.

Step 6 - The Bow
Put the heart aside. Take your ribbon and cut a strip about 9" long.
Tie your ribbon into a bow. Cut any excess ribbon off so that it looks something like this:

Put a dot of glue in between the two slits cut in the heart earlier.
Attach the bow.

Step 7 - The Saying
Since she is in preschool, I didn't find it necessary to come up with some witty saying. Besides, all I could come up with was "Because of you life doesn't suck." I don't think that would be appreciated at school. Maybe I'll put that on my mother-in-law's. She'll like it. Really, she will.


You could do this in Microsoft Word, but I'm using Publisher. I don't know why - just seems easier right now! I put my saying in a business card format, made sure there were borders, and printed. Easy peasy.
Cut out the sayings and glue them to the back of the cards.


Presto! Some cute Valentine cards to pass out to all of her friends (and family, too)!


Presto! Some cute Valentine cards to pass out to all of her friends (and family, too)!


Happy Valentine's Day!
No comments:
Post a Comment